Thursday, October 26, 2017

Flipgrid/Wheeldecide

My last post was pretty dense, so I thought I would follow it up with something a little lighter and something you can immediately implement into your classroom. I am sharing two different 'tools' that could be used in just about any grade or subject area. 

Flipgrid

First, a shout-out to Anissa Kramer for showing me this awesome tool!

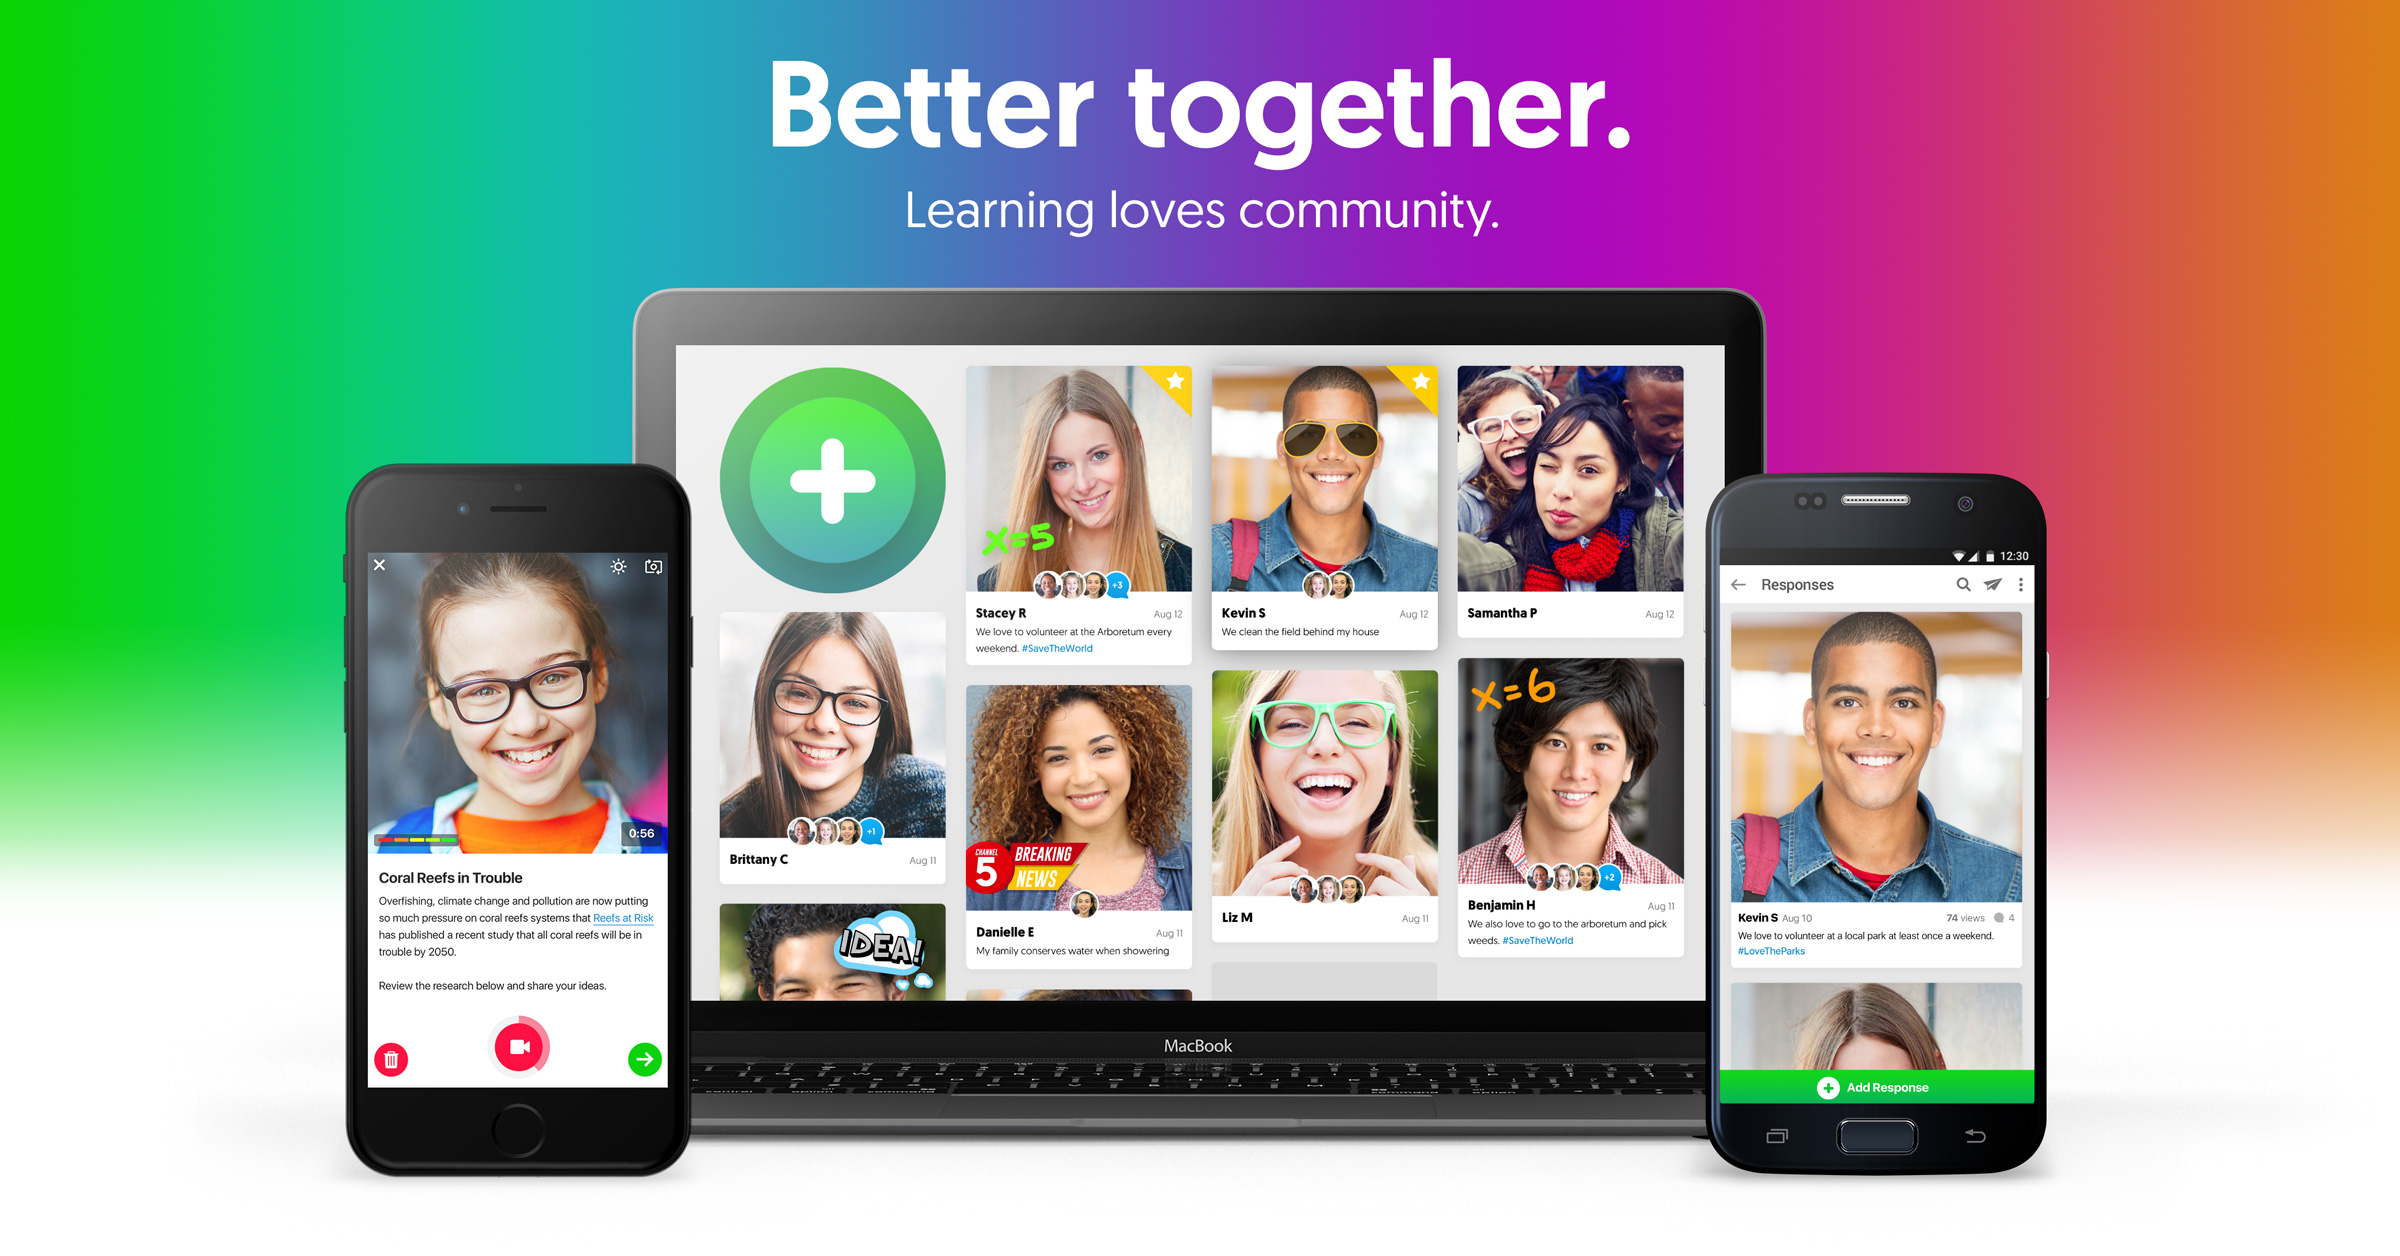
Flipgrid is a way to get 100% of your class engaged in giving feedback using short video clips. It starts with you (the teacher) posting a question or prompt to your students (via text and/or video). Students then respond by recording a  short video clip back. 

As the teacher, you can choose how long the maximum recording time is (free version is 15 or 90 seconds). You also can choose to 'approve' submissions before they are posted for the rest of the class.

Here is the best part: The students do not have to set up an account or sign in to anything! They follow a link (or for younger students you have it set-up already), and they record! For those with limited technology, you could have one Chromebook or iPad set up and rotate your students through, again without having to sign in or out (older students could even use their phones...so taboo!)

You know who is responding because they take a picture to use as a thumbnail and enter their name before submitting. I saw a demo that allowed students to post beyond the maximum allotted time by giving multiple responses and using their thumbnail picture to signify the order to watch them in (holding up fingers 1,2,etc.). I thought that was clever. 

All the responses appear in a 'grid' for you and others to see, and if you wish, respond to.

Hey...Let's Try it!  

CLICK HERE and respond to my prompt! All respondents will have a chance to win a prize (Choice of free jeans day or coupon to leave after the buses). Keep reading for details...

Wheeldecide.com


Wheeldecide.com is a place where you can make your own virtual spinner. They are really easy to make and have multiple applications. Here are a few examples of how they could be used:

- Put all the names of your students on the wheel as an alternative to 'picking sticks'.
- Give students a 'choice' by adding different types of class readings (popcorn, jigsaw, independent, small group, etc.)
- Phy Ed: put on an iPad and have students spin the wheel to see what exercise they have to do for a warm-up (15 push-ups, 20 sit-ups, etc.)
- mix up your classroom music by listing different genres (weight your favorites by listing them more than once!)
- Make a list of questions or problem numbers to assign out work (could use multiple wheels: 1 for questions and 1 for students)
- Decide where you are going for lunch!

One cool feature of Wheeldecide is that you can eliminate a choice after it has been selected. Useful for choosing the order of presentations or to make sure everyone participates equally.

How does it work? You just go to the website (www.wheeldecide.com), enter up to 100 items in your list, customize your wheel's colors/settings, and then share or embed your wheel somewhere to use it (works great using 'embed the web' content block on Powerschool Learning). That's it! There are also many pre-made wheels to choose from.

Contest details: I am going to take the names of all respondents to my Flipgrid and put them on a wheeldecide to choose the lucky winner of the prize. Deadline to respond is Thursday, November 2 at 4:00pm. Winner will be announced on Friday 11/3!

Thanks for reading and enjoy the last of the fall colors!!


Monday, October 2, 2017

It's Not About the Tool...

It's Not About the Tool...
Happy Fall! I hope your school year is off to a great start. For me, it seemed like the 'first week' of school lasted all of September (thus, why my first post is in October). There is a lot to be excited about at the beginning of the year, and I have seen teachers doing great things with technology already. I encourage everyone to take a chance and try something new this year (tech-related or not). There are so many resources out there, dive in and take a risk. If you try something and it doesn't go well, it might be reaffirming that what you are doing is effective! 

In the past, I have shared many technology tools with you that can help you achieve things in your classroom that would be near impossible to do without those tools. However, I am writing this post to tell you that those tools are not what is important. What is important, is the OUTCOME. That is, teachers should plan with the end in mind, and find the tool that gets them there after the fact. 

This sounds like a no-brainer because we do it all the time in our lives. When our sink breaks, we don't call a plumber and ask for him to bring a wrench. We ask him to fix our sink. He decides on the tool to achieve the outcome. If a plumber decided that he was only going to bring a wrench with him today, but the best tool to achieve the outcome is a plunger, he might leave that outcome and go find one he can fix with a wrench. 

This is too often how we plan for tech integration. We start with the tool in mind, but not the outcome. When we start with the tool (Powerschool Learning, iPads, Chromebooks, etc.), we don't give enough consideration to the WHY (increase engagement, increase communication, efficient collaboration, etc.). 

Many of us are setting goals (PPG's, SLO's) at the beginning of the year. Please make sure to reflect on what the outcome of those goals should look like. If you are reading a book, the book study is not an outcome. Why are you reading the book? To increase knowledge in ________? That could be your outcome. These are some outcomes of successful technology integration:

- Increase student engagement and motivation
- Gather and display data
- Collect formative feedback (Opportunities to Respond)
- Enhance classroom communication
- Provide individualized learning experiences
- Provide access to broader or deeper curricula
- Do things more efficiently
- Provide authentic experiences
- Allow for student creation/self-expression/creativity

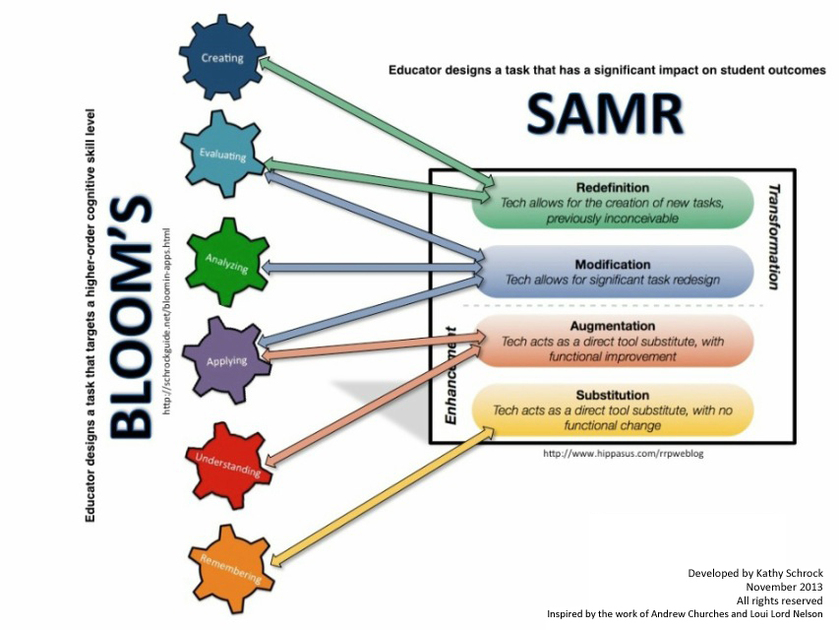
I think this conversation leads to a review of the SAMR model of meaningful technology integration, because technology can be the medium to accomplish things we know are important (having students create, evaluate, analyze, etc.). I wrote more in-depth about SAMR in this post, but here is a useful graphic that bridges the SAMR model and Bloom's Taxonomy:


Looking back, I got pretty deep for the first post of the year, but I feel it is important to encourage growth in addition to providing support with tools. I will be referring back to this throughout the year, but I also want you to know I am available to help you integrate MEANINGFUL technology into your classroom. Just give me a call or book a time for us to talk about what outcomes you want to see in your classroom, and I will help get you there. 

As always, thanks for reading and I look forward to working with you all this school year!


Thursday, April 27, 2017

(Un)written Code of Email Etiquette

The (Un)written Code of Email Etiquette
Emails are one of the most efficient means of communication we have. It's fast, easy, and your message can reach a large audience with the click of a button. However, emails can also be quite obnoxious, especially when you are on the receiving end of emails that do not pertain to you or provide no useful information. Let's take a look at some tips that are generally accepted as proper email etiquette.

When to use Email/When to Not
Every email that you send is on record, whether you delete it or not. There are times when a paper trail is very useful, and times when you want to be 'off the record' or sharing private information. This should be your first consideration..."Do I want to create a record for this information?" More considerations follow:

DO use Email:
- To provide quick information to one or multiple parties
- As a means of delivering/carrying longer messages by using attachments or links.
- When it is timely to do so (matters that cannot wait for snail-mail or an upcoming meeting and face to face or telephone is not a viable option).

DO NOT use Email:
- To give bad or negative news or information that could be misunderstood depending on tone/emotion (context)
- To deliver complex information or directions.
- When the receiver is expected to respond immediately
- To carry on a conversation among a group that regularly meets unless absolutely necessary
- When you could deliver the same message with similar energy via other means (walking and talking are good!).

Reply, Reply All, BCC:
Let's take a second to differentiate between these terms:

Reply: Receiver responds only to the sender

Reply All: Receiver's response is sent to all recipients of the original email

BCC: Blind Carbon Copy - Used by the sender to prevent group discussion. Should recipient reply all, it only will include original sender. Also, privatizes list of recipients (receiver does not see other recipients under BCC)

We have all been victims of the annoying 'Reply Alls' that go on and on and require us to delete countless emails. Perhaps we have been the inadvertent sender that replied all when we only wanted to reply to the sender (many funny stories out there on Reply All oopsies). 

So how do you know which one to use? One way is using THIS AWESOME FLOWCHART.  The general rule is that in order to Reply All that the message should be intended (and useful) for at least 70% of the audience. If it is not, then simply reply. There are better ways to have discussions/conversations than group reply- all emails. One email can get necessary participants together, and if necessary a new email can be started with only interested participants, sparing all others of worthless emails needing to be deleted.

When sending out an email, consider using the BCC field when using 'All Staff' or a large recipient list, especially if no response is expected/needed.  This can spare members of the reply-alls that sometimes come with long recipient lists.


In conclusion, we all can use occasional reminders of proper email etiquette and usage (myself included). Especially as public employees, we need to be mindful of how we are using this tool. Thanks for reading and have a great end to your April and start to your May!


Monday, April 3, 2017

Why Get Google Certified

Google Certification

G-Suite for Education (formerly Google Apps for Education) has a certification program that teaches and tests various technology-based skills surrounding their various apps (Gmail, calendar, drive, sites, etc.). I want to share a little bit about this program (mainly the Level 1 program), and why I think any teacher would benefit by becoming a G-suite Certified Educator. 

First, you don't have to be a 'techie' to become certified. After you register, you will gain access to multiple training modules. You can go through them as fast or as slow as you wish. The modules cover more than just pure technical skill but help you gain an understanding of best practice of incorporating technology into your classroom. The modules in Level 1 include increasing efficiency and saving time, facilitating and inspiring student learning and creativity, and using technology to facilitate professional growth and leadership.

You can choose which things to spend more time on and which you want to skip through. At the end of each unit, there is a short quiz (that you can take as many times as you need). Once you have completed all of the modules, you have to create a 2-part exam. Part 1 is a traditional multiple choice style test and Part 2 is a performance exam. In Part 2, you are given a new google account and asked to do various tasks like sending an email with an attachment, invite someone to a calendar event, create folders in your drive, etc. I learned a lot of little tips and tricks that I use everyday and I appreciate the time I have gained back in my workday by using some of these skills.

The level 2 program is similar to the level 1 program with more advanced trainings on data, online collaboration, and some other google tools. While this could be valuable to any educator, I don't think it would provide as much practical, useful tools as the level 1 course. I just completed the trainer course and do not think it would be of value to the general teacher. The innovator course is for those who can write code in google script, something I don't think I will pursue.

One option for those interested in gaining the certification would be to do it as a group. I would be glad to head trainings and help you prepare for the exam. You can build this into your PDP or PPG, or could just do it over a rainy spring break, a bus ride to New York, or something to do to grow over the summer!

To get started in the process, go to https://edutrainingcenter.withgoogle.com/certification_level1.

Hope everyone has a wonderful spring break and a Happy Easter!


Thursday, March 9, 2017

A School Without Substitutes?

A School Without Substitutes?
This post was inspired by a tweet I came across a little while back. Here it is:
The caption reads "Today is beta test of substitute-free teacher absences. Students are using @Schoology & common areas/labs to report to class and do work." (For those that don't know, Schoology is a Learning Management System similar to Powerschool Learning). This is happening at the high school in Austin, Minnesota. Their mascot is the...Packers! (Marquis knew that already).

I think we can all relate to some situation that caused frustration regarding quality substitute teacher availability:
- Many of us have had to cover other classes during our prep hours. 
- Others of us maybe have been absent with the hopes of our prepared lesson being executed while we were gone to find out that there was no sub so our students were sent to the library for a study hall. 
- Maybe you are that librarian or other staff member that gets kids 'dumped' on you with nothing to do.
- Perhaps you did get a sub, but don't trust that they will be able to deliver the lesson to make it worthwhile so you instead get a lesson-plan-in-a-can (movie) or find some busy work for your kids to do knowing it will be a wasted day.

Disclaimer: I am not at all trying to degrade/diminish/minimize/criticize what substitute teachers do or have done for schools and specifically my classroom. It is a thankless, difficult job that I have some experience with and no desire to ever do again, and I have great appreciation for those that do it. The point is there are many good ones, some bad ones, and overall not enough.

Anyway, I think what this school is doing creates great conversation. Here are some questions (and my answers) to how this might work:

- Who is watching the kids? They are in a semi-monitored area according to the follow up posts. Library, Commons, etc. Areas that an adult may be present but doing other things, or areas that have cameras that can be watched by other school personnel. 
- How is attendance taken? Maybe a staff member stops in, or like in this situation, the class activity was only accessible during that class period. Students had to log on, complete a task showing their presence during that time, or marked absent.
- What are the kids doing? Whatever the teacher assigned on the LMS. Maybe it was a reading with some discussion questions. Perhaps they were working on a project. Maybe they are watching a video of their teacher giving a lecture, and filling out a study guide along the way. Lots of possibilities.
- How would this even work? A teacher would prepare directions and class activities on their LMS (Powerschool Learning for us). Students would go to the designated area, log on, and complete the work. 
- So if this model works, why do we even have teachers? Why not just go all online, all the time? First, nobody is trying to replace teachers or make them robots by using technology. This model uses technology to embrace the role of the teacher by making their presence felt even when they are not there. Research shows the enormous impact an effective teacher and the relationship students have with that teacher has on student learning. It takes an effective teacher to create a lesson that will keep students engaged and learning, with minimal supervision, for an entire class period. Think of it as a 'flipped-classroom' for a day. Also, compare what you and your students could accomplish versus a 'wasted' day watching a movie or having a study hall.

No question, going totally 'sub-less' is far-out thinking. However, we can at least take away that there are some possibilities to enhance the experience for students, substitutes, and teachers when teachers have to be gone by effectively using Powerschool Learning. 

In my position, I often miss classes for meetings, trainings, etc. I have relied heavily on Powerschool Learning to execute my lessons when I am gone. I have done video directions directly to a class of students like this:


I have found that my class is much more productive when I am delivering the content (even if not in person) than when I ask someone else to relay the information via sub plans. 

I have worked with a few teachers who really beefed up their PSL because they were going to be gone on maternity leave or other extended absences. They too can comment on the value and ease of using PSL when you are gone.

What are your thoughts? Can a school work without subs? What issues do you see? What have your experiences been? Share out in the comments section! 

Wednesday, January 11, 2017

Enhancing a Youtube Video

Enhancing a Youtube Video
Using TubeChop and EDpuzzle


Just about every teacher uses a youtube video at some point during the school year to enhance a lesson. With the addition of Powerschool Learning to grades 6-12, using video in class is made easy.

However, using youtube videos in class can create some a few challenges. 1) What if you only want to show part of a video? Do you have to take time each hour skipping ahead? Do you have to tell students to start watching at a certain point and stop and another? 2) How do I know the students even watched the video? How can I assess what they learned?

Well, the two tools I am going over today can help with both of these issues.

TubeChop

TubeChop makes it easy to crop a video so you only have to show the part you want students to see. It's fast and easy and requires no log-in.

Here is what you do:
1) Go to youtube and find a video. Copy the URL to the video.
2) Go to TubeChop and paste the link.
3) Move the sliders at the beginning and end of the clip so that only the part you want is left.
4) Share your video out using a link, embedding it, or many other options.

Here is a quick video of TubeChop in action:

EdPuzzle

EdPuzzle does what you probably do when you play a youtube video in class, but it does it for every student who watches the video. You can:

1) Crop the video (like TubeChop)
2) Add your own narration on top of the playing video.
3) Have the video automatically pause, play a recorded comment, and then automatically resume.
4) Insert open answer or multiple choice questions directly into the video at any point. You can also insert 'reflection prompts' that do not require an answer, but does require the student to click a button to continue after thinking about your prompt.
5) You can then track who watches the video and their answers to your questions.

To use EdPuzzle, you do have to set up an account (using your google sign in, takes seconds) and you also have to set up a class (students add themselves with a link and a code, also using google). I set up my account and a class in under 5 minutes.

Here is a video on the creation process:


Integration Tips for Both Tools
For teachers in grades 6-12, I would suggest utilizing Powerschool Learning to embed your videos or give students necessary information (links/codes) to join your class in EdPuzzle.

For grades 3-5, you can use Google Classroom to play youtube videos (chopped or otherwise) as well as posting links to your EdPuzzle Class.

All grades (K-12) can use an EdPuzzle video as a whole-group activity. For the younger grades, I can envision a youtube video of a popular children's book that has comprehension questions inserted using EdPuzzle that the teacher would prompt the class to answer together (using SMARTboard). Older grades could have the questions pop up on the projector and each student could answer in a journal if you didn't want to give each student a device.

I think these two tools have a place in every classroom. For more information or for help integrating them into your class, please contact me. Thanks for reading!


Monday, November 21, 2016

Google Photos

Why You Should Be Using Google Photos

I attended the Midwest Google Summit in Wisconsin Dells last week, and one of the sessions I went to was on Google Photos. I had seen the commercials, spent 5 minutes on the app, but never really felt like it was worth my time to go any further with it. You can upload files to Drive, so what is the point...

Well, I have seen the light. I am a user and a believer and I think if you give it a chance you will be too. I can see the benefits in both my personal life and in my classroom. Here is a list of a few reasons why I think everyone should be using Google Photos:

1) Unlimited Free Storage of Pictures and Video
I love good commercials, and Google Photos has a great one. It clearly illustrates what I know to be a real problem for some people (ahem...Jessica Bednarek). Google Photos offers free unlimited 'High Quality' photo storage. Every picture I take is with my phone or iPad, and the quality of my picture is unchanged. If you take pictures with a better camera and are really concerned with having the highest quality of photo, there is a paid option for you to store your photos or videos at their original quality. For 95% of us, the free is all you will need.

2) Automatic upload
When I take a picture or video with my phone, I have the option of having it sync directly to Google Photos. I don't have to go through another step of sending it to myself or uploading. Snap the shot and it's there!

3) Accessible on all devices
Take a picture on your phone but want it on your mac? How about iPad? Without Google Photos, it can be a little tricky (iCloud does it, but not as well on non-apple devices). Because Google Photos can be accessed from any connected device, you have access to your pictures anywhere, anytime. 

Just getting started...


4) Assistant feature
Google Photos has a feature called 'Assistant' which looks at your photos and creates little collages, animations, etc. for you that you can keep or discard. I had taken some pictures on a trip to San Diego and the 'Assistant' put them together to make a collage. I did nothing but click 'keep'. 
You can also create your own collages, animations (think of a flipbook of your photos....works well with burst shooting videos).

As a check to see who is reading, the first person from each building to write their favorite Thanksgiving dish in the comments section of this blog will receive a small prize!

5) Easily insert into Google apps
When you choose to insert an image into a google app (docs, etc.), you get a menu like this:

If you click on the "Your Albums" tab, it opens up all your photos stored in Google Photos. You can easily add them to your docs.

6) The search feature blows my mind.....
This is harder to tell you than to show you, but I will try my best to do it justice. If I type in 'car' in the search bar of my photos, Google pulls these photos up...

 Sure it pulled the obvious pictures of Jessica saying goodbye to her car. But how did it know to find the picture of Zoey and her friend playing with the toy car? Or Zoey/Yogi riding in the car? Or a firetruck? It is cut off, but there is a picture of Zoey playing on a pile of tires! 

Another search feature that I like is that you can search by face...

It isn't foolproof, but it's pretty darn good. You could do a search at the end of the year by each student's face and it would pull up all the pictures/videos that you took of that student!

7) The application to the classroom is endless...
An activity we did at the Google Summit was that we all had our own devices (iPhones, androids, macbooks, chromebooks....you name it, the device worked) and the presenter gave us 3 minutes to take 5 pictures of 'angles'. He shared an 'album' with us and all our pictures were uploaded to the album. In just a few minutes we had over 100 pictures of angles in our every day life, and we all had access to them. From there, you could have students group the pictures by category (obtuse,acute,right), etc. Think of the uses in science, art, literature, etc. We have all heard the importance of student creation and choice. Here is an easy way to house that. In addition, you can easily create a map to include with any of your albums. A student takes a trip? Have them share a few photos and attach a map. Doing a scavenger hunt? Have them plot where they took the picture on a map (it will tell you the city automatically, but a map can create a more detailed visual). 


Google Photos is a tool that can enhance your classroom and benefit your personal life. With the holiday season around the corner, you may want to consider using Google Photos to store your holiday memories. To get Google Photos, download the free app from the app store or visit photos.google.com.

Happy Thanksgiving and thanks for reading!

Thursday, September 29, 2016

My Use of Forms

My Use of Google Forms


I wrote a more generic post about Google Forms last year, which you can read HERE. This time, I want to talk about how I specifically am using them to help myself with record keeping and documentation. I have used forms for quizzes in the past, as well as for surveys and a few conferencing type activities in the past, but I have found a whole new use (and love) with Google Forms.

First, when you think of creating a Google Form, you may envision creating it for other people to fill out (surveys, quizzes, etc.). The forms in this post are never filled out by anyone other than me. Here are a few ways that I am using forms and a few thoughts for you to consider...

Communication Log
I am in my summative year of the educator effectiveness cycle, which requires me to complete a communication log. I know what you are thinking..."Why would the 1st ever BMS Employee of the Trimester have to be evaluated?' I ask myself the same question, and I am sure it has something to do with giving the new middle school principal practice observing exemplary teachers..... :-) (Please don't fire me...I have kids!)

Seriously though, I hate doing communication logs. I find myself going weeks at a time without recording anything, and then have to try and backtrack through my email records and phone logs looking for the communications I made. I make plenty of communications, but there has to be a better way to track/document them. Insert Google Forms..

I created a Google Form for communications. I bookmarked it and added it to the homescreen of my iPad for easy access. You could even put it on your smartphone if you wanted to. Now, whenever I make a parent communication, I find my nearest device and take 20 seconds to fill out that form. All my submissions are saved in a spreadsheet, which could be prettied up and used as my log or I can just copy and paste the information into one of the communication log templates from the educator effectiveness website when the time comes.

The trick to this is making your form look like the information that would go into your log. Here is what my form looks like:

The questions are the same as the headers on the communication log. All are short text style questions that require me to type the answer except the 'mode' question. I use a dropdown box that gives options like email, letter, phone, face to face, etc. You may also notice that I do not include a question about date. I chose this because the timestamp of my submission is automatically collected. However, you may want to include that as well in case you do not complete your form on the same day that you did the communication.

Here is what the submission spreadsheet would look like (note: These are generic re-submissions because I did not want to show my real log with names, etc.):


Coaching Log
Another thing that I wanted to do a better job documenting was who/why was I seeing for technology coaching. I created a form and again, posted it in easily accessible spots. As soon as I am done seeing a teacher, I jump on my iPad and fill out the form. It takes me less than a minute. Here is the what that form looks like:


Again, I now have all this data in a spreadsheet which is useful for analysis. I can graph out what schools/departments I spend the most time in. I can filter the data to see only the submissions with a certain teacher. I find this very useful.

Parent-Teacher Conferences
With Parent-Teacher Conferences coming up in less than a month, you may want to consider using a Google Form to document the content of your conferences. 1) It will give you structure to your conference. If you use the form as a guideline (Class background, Student progress/grades, strengths, areas of growth/concern, behavior/effort, parent-feedback, etc.) you may find that your conferences are more efficient. 2) You can refer back to the notes you took during the fall and during the winter conference to reflect on gains made. 3) You have the notes to refer to in case something comes up: Mr. Smith, "I mentioned how Johnny was struggling handing in his work during conferences. He is still missing many assignments....."

I hope that you can find a use for a Google Form somewhere in your classroom and I would be more than willing to come in and help you get set up. 

On a separate note, I am off on paternity leave from October 3rd -October 14th. I will be back on Monday October 17th. I will check my email in between diaper changes and naps, but if it is something pressing you would be best contacting helpdesk so Dave or Adam can assist.

Until then, thanks for reading and have a great homecoming week!

Thursday, September 15, 2016

Welcome Back!

Who's Excited to be Back?!?!

I hope everyone enjoyed their summer and are starting to get back into the routine of things again this year. I know how overwhelming the beginning of the year can be. So much information all at once and no time to do anything with it!!!

First, remember that this post stays on the blog under the 'Archived posts', so if you don't want to read now, you can always come back to get this information later. That being said, I wanted to remind you of some of the resources available to you as you start the year as well as give you an update on some upcoming plans.

Staff Access Site
On the far right of the district webpage, is the link to Staff Access:

If you click there (you must be signed into google with your school account), it will take you to a page to select your school. Under your school, you have links to many of your most visited/needed sites:

I tried to update as many of them as I could, but if you find something is not right or if I can remove something that is no longer in use, please let me know. I can add to this site as well, but to prevent it from being too cluttered, I ask that it would benefit more than just a few teachers in your building.

One of the links on that site is the TECHNOLOGY SITE. I made a few changes to this site that I hope you find useful:

Technology Site
First of all, please remember that if you need help, that you can use the 'REQUEST HELP' page on the site. Here you have the option of requesting a tutorial be made (for you or students), OR you can book time with me.


A new page this year is the RESOURCE LIBRARY. What used to be a long, unorganized list of technology tutorials is now organized by category. I will continue to add as requests come in and I hope you find this page very useful.

Upcoming Plans
The implementation of Powerschool Learning (PSL) as a  universal Learning Management System (LMS) into BMS and BHS has been a massive undertaking (BTW, that is 5 acronyms in one sentence...Booyah!). It will continue to draw most of my time through this first month until everyone gets comfortable with it. 

Judy was kind enough to give me a Wednesday in the green room at Clay on October 26th, where I will be able to meet with every grade level and any specialists. If any teachers at Clay want me to attend one of their meetings on any other day, please go ahead and book me and I will make it!

I will be doing some NON-EVALUATIVE classroom observation/coaching this year. If you are teaching a lesson that uses technology, I would love to come and see what you are doing. If you are teaching a lesson and want me to observe it and give feedback on possible uses of technology, again, would be glad to do so. 

It is my goal to meet with every teacher in the district either individually or as a team this year, so if you don't seek me, I will seek you ;) 

Have a great ending to your first month back and remember there is light at the end of the tunnel.....


Powerschool Learning Updates

Powerschool Learning Updates

Parents
Some teachers are itchy to get parents attached to PSL. I ask that you please be patient with this. We are now set up to do it, however we are going to give all teachers some more time to get themselves acquainted with PSL before we connect parents. A plan is place to do a roll-out in October with literature going in newsletters, newspaper, etc. and at Parent-Teacher Conferences on October 20th parents will get their personalized log in information attached to their child's schedule/progress report at both the MS and HS. If a parent doesn't attend conferences, the letter will be mailed home. 

When a parent is connected to their child's account, they will be able to see everything their child would see, but they cannot edit anything. This includes classes, class content, assignment information, their child's work, and grades (if done on PSL). 

If you would like parents to 'view' your class before the late October roll-out, you can make your class publicly viewable, and share the link through an email. With this option, a parent would see your class content, but would not see any grades/work/etc. To make your class publicly viewable:
1) Go into the desired class
2) On the far right near the top Manage Class> Class Settings.

3) Under Class Settings, scroll down to the 'settings block' where you will see your current class visibility settings:

4) Change 'Only people in the class roster to 'Anyone on the Web.' and click save.

Again, you can now send that link to parents via email and they can view your class.

Class Calendars
I hope at a minimum that every teacher is keeping current their class calendar. This is an important piece as it allows a student to see a snapshot of all their class activities right when they log on. Think of it as 'filling out a planner' for the student. The middle school can use this to replace the Google Calendars as it shows all classes in one calendar for the student (and soon parent) rather than clicking on each individual class. Should you give access to your parents in advance by using the method above, they will also be able to see your calendar (although only by individual class). Here is a snapshot of what a student sees and why filling out your calendar is so important:

As you can see, this student has an exam in Spanish today, a quiz in science on Tuesday, and some class activities in Tech Exploration and Personal Finance. Please keep your calendars current. If you are unsure how to do this, please watch this 1 minute video on CREATING AN EVENT IN YOUR PSL CALENDAR:


SUPPORT STAFF/SHADOWING
I sent out an email regarding 'Shadowing for support staff and special ed teachers. Please make sure that these teachers are NOT enrolled in your classes as students or teachers (unless they need editing rights to your class). The 'shadow' feature should give teachers/aides access to all they need. For more information on shadowing, talk to me or watch the video on the PSL resource site....

RESOURCES
All the PSL resources are posted in the RESOURCE LIBRARY off of the Technology Site. 

TRAININGS
I will be hosting more trainings when football is complete for those who want to go further. However, I encourage you to talk to your colleagues on what they are doing with PSL. Some teachers are doing some really innovative things that can make life easier for both you and your students.


The enthusiasm towards PSL this fall has been great. I really appreciate everyone being patient as we work through occasional hiccups and I look forward to working with all of you to help make PSL a part of your classroom.

Thursday, June 2, 2016

Happy Summer!

My First Year is in the Books!
I am not sure how you feel, but this year whizzed by for me. I am sure the new position and new addition to my family had something to do with that. Although I am happy with some of our technology growths, I can see there is much room for improvement both personally and as a district. I feel we have a skeleton for what could be a very efficient program and I will use what I learned this year to be even better next year. 

One of the highest viewed pieces I made this year was a cartoon called a Plotagon (You may remember it was a 'present' to Jess for our anniversary). At the time, Plotagon was only available as an iPad app. Now it can be installed on PC and Mac computers. At this time, it is not available for chromebooks. 

Rather than bore you with information in the last days of school, I decided to create another Plotagon for your enjoyment. 


Thank you all for a great year. I love what I do and it's because of the people I work with. Have a great summer!

Wednesday, March 9, 2016

A few Updates!

A Few Updates (and a little reassurance...)!

Haiku/Friday's Inservice
Exciting times are upon us: Temperatures in the 60's, Spring Training well underway, March Madness starting up (a time when even the most non techy people figure out a way to stream live games on their computers and complete digital brackets), and most importantly we have our Haiku LMS pilot running at the MS/HS! 

We have had well over 200 different students log in to haiku in the first 3 days, and 50+ staff members. I think that is a great start, and I hope to see the numbers grow closer to 100% for both staff and students. I get a report of recent log ins, and last night there were multiple BHS and BMS students accessing Haiku well after school hours. Some staff may not see the value in an LMS yet, but students are logging in and are looking for information.....As their teacher, what do you want to tell/show them? 

After talking with some staff about Friday's inservice, it seemed to have gone very well. I hope everyone found at least 1 or 2 things that they can use in their classroom. Thanks again to Jamie, Jared, Adam, Ben, and Luke for presenting.  I also want to thank Dave W for his help in setting up Haiku and troubleshooting when needed. Finally, thank you to the teachers who came on board to this Haiku thing with an open mind and some enthusiasm. It is a joy to work with teachers who are still learners themselves.

I am always available for anyone who needs help with Haiku. Please don't be intimidated by it or feel overwhelmed. I am here to help and can make Haiku work for you the way you want it to.  I will be holding more formal trainings as we go through the Tri. This takes time, and that is why I wanted to 'dip our toes' in now. Please remember to at least update your calendars and add a little something to your class page(s) (contact info, syllabus, expectations, course description, etc). Once more, I can help if you need it. Please just ask.

Here are a few Haiku resources for you if you didn't already know about them:
Another great resource is in Haiku. While in Haiku Click Library at the top, and Open 'Haiku Learning How To (Teachers)' 
Finally, there are plenty of Q&A that might help HERE.

Mac Reminders
It is a good idea to update your Mac to El Capitan of you have not done so yet. Many of the teachers that are having issues are using the old operating system and the update takes care if the glitches. To do this:
- open the App Store (blue icon with a compass?)
- Choose updates on the top
- You will see a big banner about El Capitan OS with an "upgrade" button if you haven't done it yet. 
- You may have to set up an apple id (use your school email) if you haven't already.

It is also good to restart your computer every day or two. This will make your computer run faster and helps eliminates any glitches as well.

If you are having SMARTboard communication issues, it might be because when your computer falls 'asleep', that it loses communication with the SMARTboard. You can change the settings on your Mac to not fall asleep or fall asleep after a longer amount of time. System Preferences>Energy Saver. (Note: If your computer is not plugged in, staying 'awake' will drain your battery much quicker.)


Thanks for reading and hope your 3rd Tri is off to a great start. The end is near!!

Hey, Tech this out!
I am sort of copping out of this section today, but hope you find this useful.....

I held a training for some MS/HS support staff Friday afternoon and one of the tips they really found useful was some of the Chrome keyboard shortcuts I use. I thought I would share:

Keyboard Shortcuts for Chrome
CMD + shift + T (on a mac) OR ctrl + shift + T (PC/Chromebook) = Opens last tab you closed out of (Can repeat up to 10 times)
- Good for those times when you accidentally close out of a tab.
- Also good for busting students when they quick close out of something when you walk by :) (CMD + T = new tab)

CMD + (+) , CMD + (-) , CMD + 0 (on a mac) or ctrl + (+) , ctrl + (-) , ctrl + 0 (on PC/Chromebook) = Zoom in, Zoom out, Return to Normal Zoom (100%)

CTRL + L (Mac) or cmd + L (PC/Chrome) = Highlight page URL (useful instead of using mouse and dragging or triple clicking to highlight whole thing.

CMD + X, CMD + C,  CMD + V (Mac) or ctrl+x, ctrl + c, ctrl + v (PC/Chrome) = Cut, Copy, Paste (respectively)